搜索到
65
篇与
的结果
-
![宝塔面板安装ImgURL图床[转载]](https://npm.elemecdn.com/typecho-joe-latest/assets/img/lazyload.jpg) 宝塔面板安装ImgURL图床[转载] 宝塔面板安装ImgURL图床[转载]ImgURL是一个开源、免费的图床程序,ImgURL 2.x之后对环境要求更高,尤其是ImageMagick组件的支持,很多朋友不清楚怎样安装这个组件,这篇文章分享宝塔面板安装ImgURL 2.x图床的过程(包括ImgURL 2.x需要的各种组件)准备工作已经安装宝塔面板在宝塔后台创建一个站点下载ImgURL 2.x 上传到站点根目录并解压设置伪静态如果您宝塔面板安装的Apache则不需要再设置伪静态,直接跳过这个步骤,如果使用的Nginx环境,请继续往下看。找到对应的站点 - 点击后面设置按钮 - 伪静态 - 添加下面的伪静态规则location / { try_files $uri $uri/ /index.php?$query_string; } location ~* \.(db3|json)$ { deny all; } location ~* ^/(temp|upload|imgs|data|application|static|system)/.*.(php|php5)$ { return 403; }安装fileinfo & imagemagick在宝塔后台 - 软件管理 - 找到您站点对应的PHP版本 - 设置PHP - 安装扩展 - 勾选fileinfo和imagemagick,如下截图。安装ImgURL 2.x其它所需扩展宝塔默认已经支持,重点是安装fileinfo和imagemagick,扩展安装完毕后就可以访问您自己的域名安装ImgURL了,如果正常会看到ImgURL安装界面。其它说明如果安装遇到任何问题,请留言反馈或到 3T官方社区 进行反馈ImgURL更多使用说明请参考帮助文档:https://dwz.ovh/imgurldoc开源不易,如果您觉得ImgURL还不错,请访问这里捐赠参考资料宝塔面板安装ImgURL图床:https://www.xiaoz.me/archives/12081
宝塔面板安装ImgURL图床[转载] 宝塔面板安装ImgURL图床[转载]ImgURL是一个开源、免费的图床程序,ImgURL 2.x之后对环境要求更高,尤其是ImageMagick组件的支持,很多朋友不清楚怎样安装这个组件,这篇文章分享宝塔面板安装ImgURL 2.x图床的过程(包括ImgURL 2.x需要的各种组件)准备工作已经安装宝塔面板在宝塔后台创建一个站点下载ImgURL 2.x 上传到站点根目录并解压设置伪静态如果您宝塔面板安装的Apache则不需要再设置伪静态,直接跳过这个步骤,如果使用的Nginx环境,请继续往下看。找到对应的站点 - 点击后面设置按钮 - 伪静态 - 添加下面的伪静态规则location / { try_files $uri $uri/ /index.php?$query_string; } location ~* \.(db3|json)$ { deny all; } location ~* ^/(temp|upload|imgs|data|application|static|system)/.*.(php|php5)$ { return 403; }安装fileinfo & imagemagick在宝塔后台 - 软件管理 - 找到您站点对应的PHP版本 - 设置PHP - 安装扩展 - 勾选fileinfo和imagemagick,如下截图。安装ImgURL 2.x其它所需扩展宝塔默认已经支持,重点是安装fileinfo和imagemagick,扩展安装完毕后就可以访问您自己的域名安装ImgURL了,如果正常会看到ImgURL安装界面。其它说明如果安装遇到任何问题,请留言反馈或到 3T官方社区 进行反馈ImgURL更多使用说明请参考帮助文档:https://dwz.ovh/imgurldoc开源不易,如果您觉得ImgURL还不错,请访问这里捐赠参考资料宝塔面板安装ImgURL图床:https://www.xiaoz.me/archives/12081 -
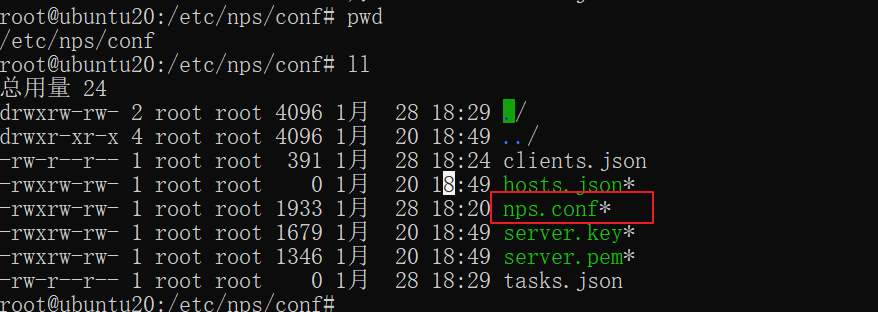
nps 服务端安装和配置 nps 服务端安装和配置0.说明项目github地址https://github.com/ehang-io/nps前置条件一个有公网IP的服务器上,系统为Linux/Windows均可。1. 服务端安装和启动1.1 下载安装所需文件mkdir nps cd nps wget https://github.com/ehang-io/nps/releases/download/v0.26.9/linux_amd64_server.tar.gz1.2 解压tar xzvf linux_amd64_server.tar.gz1.3 安装./nps install备注:安装完成后相关配置文件和web文件夹位于/etc/nps中1.4 修改相关配置注意:配置文件不是解压出来的文件夹中的conf文件,而是/etc/nps中的配置文件配置文件所在位置打开配置文件cd /etc/nps cd conf # 可以看到该文件夹中有一个nps.conf文件便是待修改的配置文件 vim nps.conf修改配置文件(仅仅修改带注释的部分即可)appname = nps #Boot mode(dev|pro) runmode = dev #HTTP(S) proxy port, no startup if empty http_proxy_ip=0.0.0.0 http_proxy_port=80 #vhttp端口 https_proxy_port=443 #vhttps端口 https_just_proxy=true #default https certificate setting https_default_cert_file=conf/server.pem https_default_key_file=conf/server.key ##bridge bridge_type=tcp bridge_port=8024 #客户端连接端口 bridge_ip=0.0.0.0 # Public password, which clients can use to connect to the server # After the connection, the server will be able to open relevant ports and parse related domain names according to its own configuration file. public_vkey=123 #Traffic data persistence interval(minute) #Ignorance means no persistence #flow_store_interval=1 # log level LevelEmergency->0 LevelAlert->1 LevelCritical->2 LevelError->3 LevelWarning->4 LevelNotice->5 LevelInformational->6 LevelDebug->7 log_level=7 #log_path=nps.log #Whether to restrict IP access, true or false or ignore #ip_limit=true #p2p #p2p_ip=127.0.0.1 #p2p_port=6000 #p2p隧道端口 #web web_host=a.o.com web_username=admin web_password=123 web_port = 8080 #web管理端口 web_ip=0.0.0.0 web_base_url= web_open_ssl=false web_cert_file=conf/server.pem web_key_file=conf/server.key # if web under proxy use sub path. like http://host/nps need this. #web_base_url=/nps #Web API unauthenticated IP address(the len of auth_crypt_key must be 16) #Remove comments if needed #auth_key=test auth_crypt_key =1234567812345678 #allow_ports=9001-9009,10001,11000-12000 #Web management multi-user login allow_user_login=false allow_user_register=false allow_user_change_username=false #extension allow_flow_limit=false allow_rate_limit=false allow_tunnel_num_limit=false allow_local_proxy=false allow_connection_num_limit=false allow_multi_ip=false system_info_display=false #cache http_cache=false http_cache_length=100 #get origin ip http_add_origin_header=false #pprof debug options #pprof_ip=0.0.0.0 #pprof_port=9999 #client disconnect timeout disconnect_timeout=60保持配置文件1.5 启动npsnps start2.服务端使用2.1 登录后台,添加客户端默认用户名:admin默认密码:1232.2 查看客户端连接命令2.3 客户端连接见博客:nps客户端使用连接上的状态如下图所示:3. 为客户端配置隧道TCP隧道然后通过`服务器IP:50080即可访问该`客户端位于60080端口的服务。
-
nps客户端使用 nps客户端使用1.进入github releases安装页面下载对应版本的客户端并解压地址:https://github.com/cnlh/nps/releases2.windows系统临时启动#进入npc文件所在的目录 cd npc文件所在的目录 #启动客户端,比如服务端公网IP为1.1.1.1,服务端配置文件中tcpport为8024 ./npc -server=1.1.1.1:8024 -vkey=客户端的密钥注册服务(开机启动,守护进程)用 nps 自带的命令,很方便的注册到服务中,使用管理员身份运行cmdnpc.exe install -server=1.2.3.4:8024 -vkey=客户端的密钥常用命令# 启动 npc start # 停止 npc stop # 卸载 npc uninstall3.linux系统./#进入npc文件所在的目录 cd npc文件所在的目录 #启动客户端,比如服务端公网IP为1.1.1.1,服务端配置文件中tcpport为8284 npc.exe -server=1.1.1.1:8284 -vkey=客户端的密钥
-
Ubuntu上安装tinyproxy搭建HTTP代理服务器 0.什么是TinyProxy它是一个代理服务器,用来实现http或https代理,windows系统一直在用ccproxy, 非windows系统,怎么开放个http代理呢?那就是TinyProxy。1.TinyProxy安装sudo apt-get update apt-get install tinyproxy2.配置参数文件vi /etc/tinyproxy.conf修改下面两个部分:Port 8888 #预设是8888 Port,你可以更改 Allow 127.0.0.1 #将127.0.0.1改成你自己的IP #例如你的IP 是1.2.3.4,你改成Allow 1.2.3.4,那只有你才可以连上这个Proxy #若你想任何IP都可以脸到Proxy在Allow前面打#注释3.TinyProxy打开与关闭service tinyproxy start/restart/stop4.连接测试在另一台客户机上输入curl -x <IP>:<PORT> www.baidu.com其中IP和PORT是代理服务器的IP和代理端口,如果出现百度的源代码,则证明代理配置成功。参考资料Ubuntu上安装tinyproxy搭建HTTP代理服务器:https://blog.csdn.net/weixin_41010318/article/details/85015976腾讯云Ubuntu搭建TinyProxy代理服务器:https://cloud.tencent.com/developer/article/1004731
-
搭建web IDE--Code-server 搭建web IDE--Code-server原理基础code-server是一款基于VScode的在线编辑器,主要用于在Linux服务器环境下,实现任何设备通过浏览器即可访问VScode, 进而实现在远程编程.官方文档GIthub官方安装教程文档:https://github.com/cdr/code-server/blob/v3.8.0/doc/install.mdDebian, Ubuntucurl -fOL https://github.com/cdr/code-server/releases/download/v3.8.0/code-server_3.8.0_amd64.deb sudo dpkg -i code-server_3.8.0_amd64.deb sudo systemctl enable --now code-server@$USER # Now visit http://127.0.0.1:8080. Your password is in ~/.config/code-server/config.yamlFedora, CentOS, RHEL, SUSEcurl -fOL https://github.com/cdr/code-server/releases/download/v3.8.0/code-server-3.8.0-amd64.rpm sudo rpm -i code-server-3.8.0-amd64.rpm sudo systemctl enable --now code-server@$USER # Now visit http://127.0.0.1:8080. Your password is in ~/.config/code-server/config.yamlArch Linux# Installs code-server from the AUR using yay. yay -S code-server sudo systemctl enable --now code-server@$USER # Now visit http://127.0.0.1:8080. Your password is in ~/.config/code-server/config.yaml # Installs code-server from the AUR with plain makepkg. git clone https://aur.archlinux.org/code-server.git cd code-server makepkg -si sudo systemctl enable --now code-server@$USER # Now visit http://127.0.0.1:8080. Your password is in ~/.config/code-server/config.yamlDebian, Ubuntucurl -fOL https://github.com/cdr/code-server/releases/download/v3.8.0/code-server_3.8.0_amd64.deb sudo dpkg -i code-server_3.8.0_amd64.deb sudo systemctl enable --now code-server@$USER # Now visit http://127.0.0.1:8080. Your password is in ~/.config/code-server/config.yamlFedora, CentOS, RHEL, SUSEcurl -fOL https://github.com/cdr/code-server/releases/download/v3.8.0/code-server-3.8.0-amd64.rpm sudo rpm -i code-server-3.8.0-amd64.rpm sudo systemctl enable --now code-server@$USER # Now visit http://127.0.0.1:8080. Your password is in ~/.config/code-server/config.yamlArch Linux# Installs code-server from the AUR using yay. yay -S code-server sudo systemctl enable --now code-server@$USER # Now visit http://127.0.0.1:8080. Your password is in ~/.config/code-server/config.yaml # Installs code-server from the AUR with plain makepkg. git clone https://aur.archlinux.org/code-server.git cd code-server makepkg -si sudo systemctl enable --now code-server@$USER # Now visit http://127.0.0.1:8080. Your password is in ~/.config/code-server/config.yamlmacOSbrew install code-server brew services start code-server # Now visit http://127.0.0.1:8080. Your password is in ~/.config/code-server/config.yamlDocker# This will start a code-server container and expose it at http://127.0.0.1:8080. # It will also mount your current directory into the container as `/home/coder/project` # and forward your UID/GID so that all file system operations occur as your user outside # the container. # # Your $HOME/.config is mounted at $HOME/.config within the container to ensure you can # easily access/modify your code-server config in $HOME/.config/code-server/config.json # outside the container. mkdir -p ~/.config docker run -it --name code-server -p 127.0.0.1:8080:8080 \ -v "$HOME/.config:/home/coder/.config" \ -v "$PWD:/home/coder/project" \ -u "$(id -u):$(id -g)" \ -e "DOCKER_USER=$USER" \ codercom/code-server:latest
![宝塔面板安装ImgURL图床[转载]](/usr/uploads/auto_save_image/4bd8a3f3bceb1385a99ed317764792aa.png)