YOLOv3学习:(三)模型输出解码
YOLOv3 模型输出输出

模型输出解码-理论(以13*13为例)
解码目标

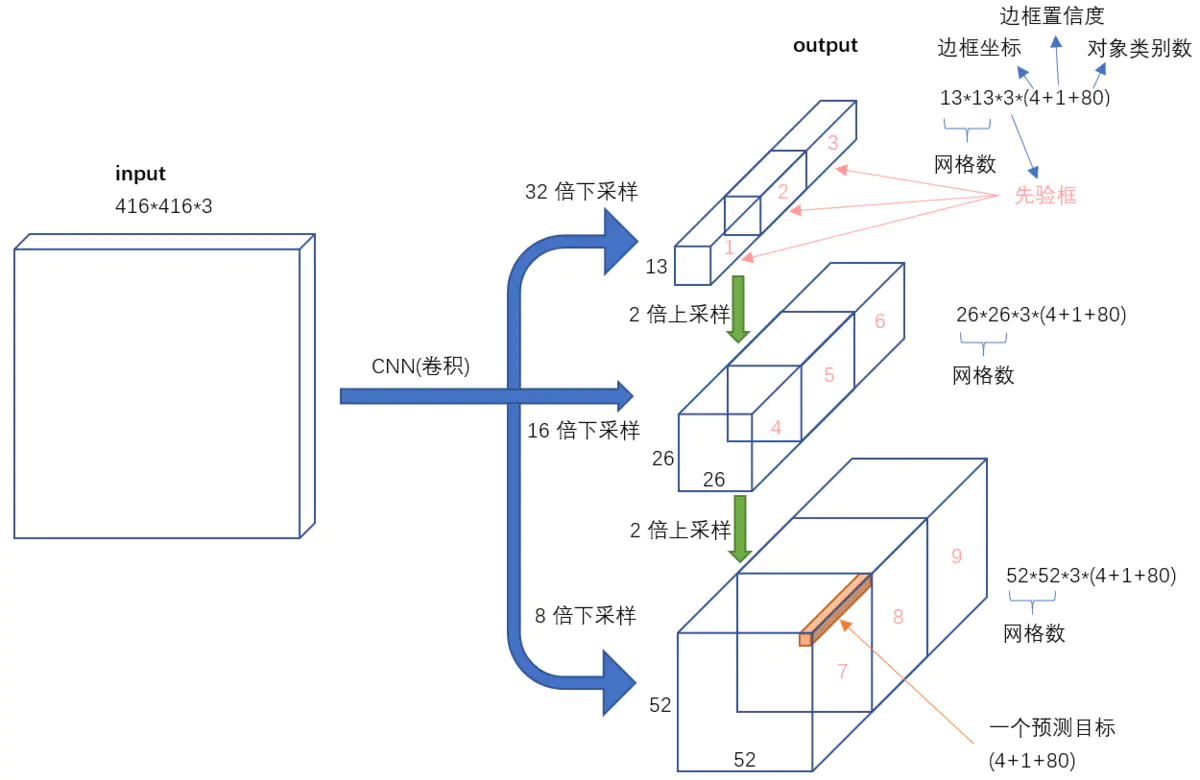
模型输出shape:[batch_size, 255, 13, 13]
255 = 3(先验框数量)*(x_offset+y_offset+w_scale+h_scale+有无物体置信度+类别置信度)
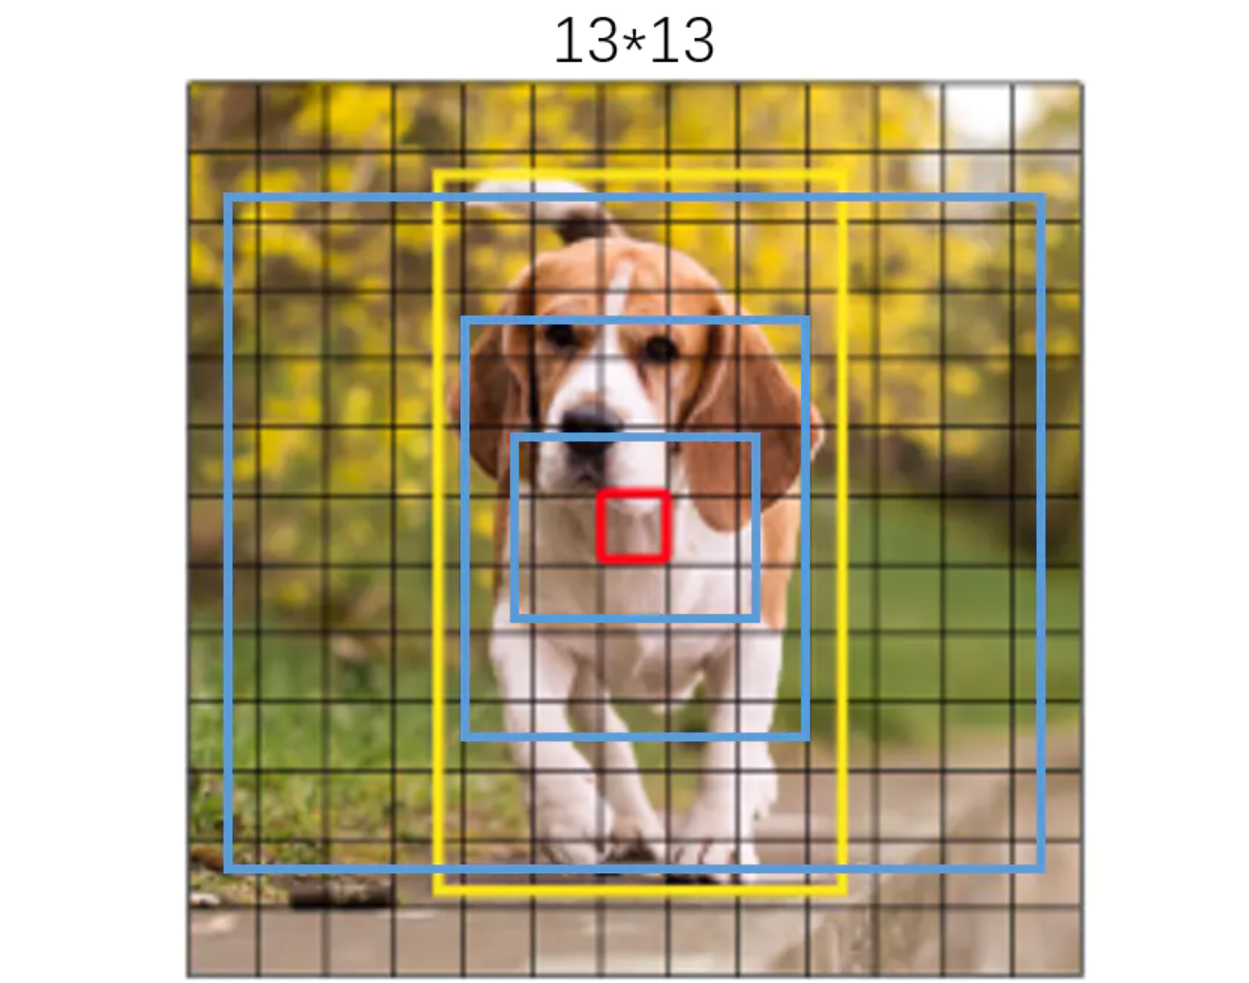
即原模型将图像分割为13*13的小块进行预测,每个小块负责根据先验框预测3个框,每个预测框以小格的左上角为基准点,以先验框的w和h为基准。
$$ 预测框w=先验框w \times e^{w\_scale} $$
$$ 预测框h=先验框h \times e^{h\_scale} $$
模型输出解码的目标即为将输出结果的x_offset+y_offset+w_scale+h_scale部分进行校正,变成以整个图片的最左上角(0,0)点为基准点,并对每个预测框的w,h根据先验框进行对应校正。最终的到3*13*13个预测框。
即解码输出shape:[batch_size, 3*13*13,85]
85=x_offset+y_offset+w_scale+h_scale+有无物体置信度+类别置信度

模型输出解码-代码
# YOLOv3 超参数
from easydict import EasyDict
super_param = \
{
    "anchors": [[[116, 90], [156, 198], [373, 326]],
                [[30, 61], [62, 45], [59, 119]],
                [[10, 13], [16, 30], [33, 23]]],
    "num_classes": 80,
    "img_size":(416,416),
}
super_param = EasyDict(super_param)
print(super_param.img_size)

# YOLOv3模型输出结果解码器
"""
    模型输出结果解释:
        以[batch_size, 255, 13, 13]为例 255 = 3(先验框数量)*(x_offset+y_offset+w+h+有无物体置信度+类别置信度)
        代表将原图划分为13*13 然后每个小框负责预测3个框
        每个框的中心点为(框的左上角x+x_offset,框的左上角y+y_offset)
        每个框的w和h为 torch.exp(w.data) * anchor_w 和torch.exp(h.data) * anchor_h

    解码输出结果解释:
        实例对应输出shape为[batch_size,3*13*13,85],即共预测了3*13*13个boxm
        每个box的具体参数为(x+y+w+h+有无物体置信度+80个类别置信度)共85个

"""
class DecodeBox(nn.Module):
    def __init__(self, anchors = super_param.anchors[0], num_classes = super_param.num_classes, img_size = super_param.img_size):
        super(DecodeBox, self).__init__()
        self.anchors = anchors
        self.num_anchors = len(anchors)
        self.num_classes = num_classes
        self.img_size = img_size

    def forward(self, input):
        # 获取YOLOv3单路输出的结果shape信息
        batch_size,input_height,input_width = input.size(0),input.size(2),input.size(3)

        # 计算步长
        stride_h,stride_w = self.img_size[1] / input_height,self.img_size[0] / input_width

        # 把把先验框归一到特征层上 eg:[116, 90], [156, 198], [373, 326] --》[116/32, 90/32], [156/32, 198/32], [373/32, 326/32]
        scaled_anchors = [(anchor_width / stride_w, anchor_height / stride_h) for anchor_width, anchor_height in self.anchors]

        # 对预测结果进行reshape
        # eg:[batch_size, 255, 13, 13] -->[batch_size,num_anchors,input_height,input_width,5 + num_classes](batch_size,3,13,13,85)
        # 维度中的85包含了4+1+80,分别代表x_offset、y_offset、h和w、置信度、分类结果。
        prediction = input.view(batch_size, self.num_anchors,
                                5 + self.num_classes, input_height, input_width).permute(0, 1, 3, 4, 2).contiguous()

        # 先验框的中心位置的调整参数
        x_offset,y_offset = torch.sigmoid(prediction[..., 0]),torch.sigmoid(prediction[..., 1])

        # 先验框的宽高调整参数
        w,h = prediction[..., 2],prediction[..., 3]  # Width.Height

        # 获得置信度,是否有物体
        conf = torch.sigmoid(prediction[..., 4])

        # 种类置信度
        pred_cls = torch.sigmoid(prediction[..., 5:])  # Cls pred.

        FloatTensor = torch.cuda.FloatTensor if x_offset.is_cuda else torch.FloatTensor
        LongTensor = torch.cuda.LongTensor if x_offset.is_cuda else torch.LongTensor

        # 生成网格,先验框中心,网格左上角
        grid_x = torch.linspace(0, input_width - 1, input_width).repeat(input_width, 1).repeat(
            batch_size * self.num_anchors, 1, 1).view(x_offset.shape).type(FloatTensor)
        grid_y = torch.linspace(0, input_height - 1, input_height).repeat(input_height, 1).t().repeat(
            batch_size * self.num_anchors, 1, 1).view(y_offset.shape).type(FloatTensor)

        # 生成先验框的宽高
        anchor_w = FloatTensor(scaled_anchors).index_select(1, LongTensor([0]))
        anchor_h = FloatTensor(scaled_anchors).index_select(1, LongTensor([1]))
        anchor_w = anchor_w.repeat(batch_size, 1).repeat(1, 1, input_height * input_width).view(w.shape)
        anchor_h = anchor_h.repeat(batch_size, 1).repeat(1, 1, input_height * input_width).view(h.shape)

        # 计算调整后的先验框中心与宽高
        pred_boxes = FloatTensor(prediction[..., :4].shape)
        pred_boxes[..., 0] = x_offset.data + grid_x
        pred_boxes[..., 1] = y_offset.data + grid_y
        pred_boxes[..., 2] = torch.exp(w.data) * anchor_w
        pred_boxes[..., 3] = torch.exp(h.data) * anchor_h

        # 用于将输出调整为相对于416x416的大小
        _scale = torch.Tensor([stride_w, stride_h] * 2).type(FloatTensor)
        output = torch.cat((pred_boxes.view(batch_size, -1, 4) * _scale,
                            conf.view(batch_size, -1, 1), pred_cls.view(batch_size, -1, self.num_classes)), -1)
        return output.data
测试
fake_out1 = torch.zeros((1,255,13,13))
print(fake_out1.shape)

decoder = DecodeBox()
out1_decode = decoder(fake_out1)
print(out1_decode.shape)
torch.Size([1, 255, 13, 13])
torch.Size([1, 507, 85])参考资料
- Pytorch 搭建自己的YOLO3目标检测平台(Bubbliiiing 深度学习 教程):https://www.bilibili.com/video/BV1Hp4y1y788?p=11&spm_id_from=pageDriver

评论 (0)