1.概述
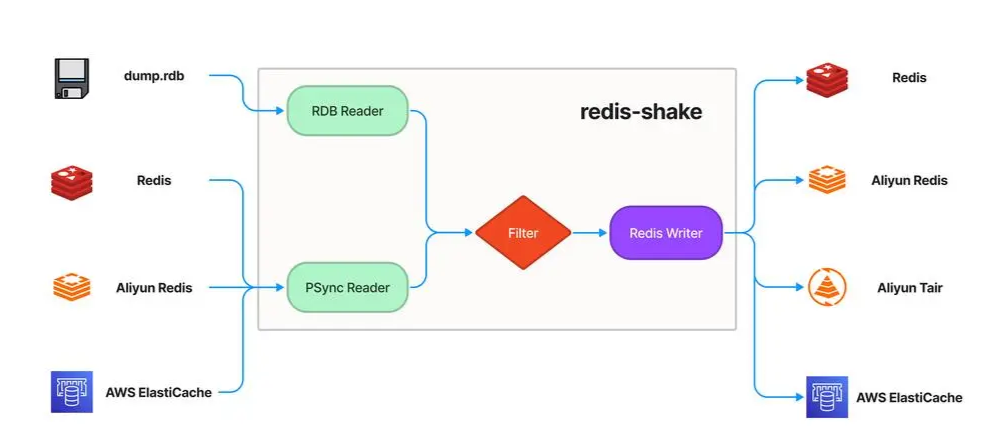
RedisShake 是一个用于处理和迁移 Redis 数据的工具,它提供以下特性:
- Redis 兼容性:RedisShake 兼容从 2.8 到 7.2 的 Redis 版本,并支持各种部署方式,包括单机,主从,哨兵和集群。
云服务兼容性
:RedisShake 与主流云服务提供商提供的流行 Redis-like 数据库无缝工作,包括但不限于:
- Module 兼容:RedisShake 与 TairString,TairZSet 和 TairHash 模块兼容。
- 多种导出模式:RedisShake 支持 PSync,RDB 和 Scan 导出模式。
- 数据处理:RedisShake 通过自定义脚本实现数据过滤和转换。

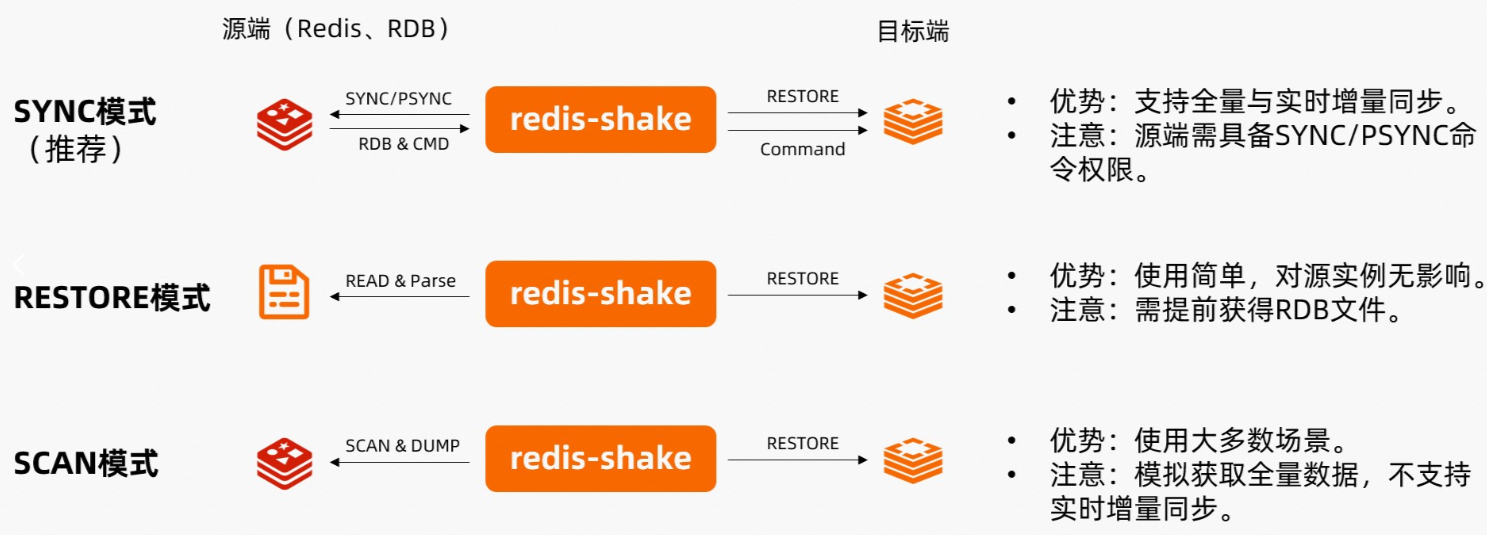
RedisShake 支持三种模式的数据同步方式:

2.下载安装
下载地址:Releases · tair-opensource/RedisShake (github.com)
wget https://github.com/tair-opensource/RedisShake/releases/download/v4.1.1/redis-shake-linux-amd64.tar.gz
mkdir redis-shake
tar xzvf redis-shake-linux-amd64.tar.gz -C redis-shake
mv redis-shake /software/
cd /software/redis-shake/
3.配置介绍
一般用法下,只需要书写 xxx_reader、xxx_writer 两个部分即可
sync_reader
[sync_reader]
cluster = false            # set to true if source is a redis cluster
address = "127.0.0.1:6379" # when cluster is true, set address to one of the cluster node
username = ""              # keep empty if not using ACL
password = ""              # keep empty if no authentication is required
tls = false
sync_rdb = true # set to false if you don't want to sync rdb
sync_aof = true # set to false if you don't want to sync aofcluster:源端是否为集群address:源端地址, 当源端为集群时,address为集群中的任意一个节点即可鉴权:
- 当源端使用 ACL 账号时,配置
username和password - 当源端使用传统账号时,仅配置
password - 当源端无鉴权时,不配置
username和password
- 当源端使用 ACL 账号时,配置
tls:源端是否开启 TLS/SSL,不需要配置证书因为 RedisShake 没有校验服务器证书sync_rdb:是否同步 RDB,设置为 false 时,RedisShake 会跳过全量同步阶段sync_aof:是否同步 AOF,设置为 false 时,RedisShake 会跳过增量同步阶段,此时 RedisShake 会在全量同步阶段结束后退出
Redis Writer
redis_writer 用于将数据写入 Redis-like 数据库。
[redis_writer]
cluster = false
address = "127.0.0.1:6379" # when cluster is true, address is one of the cluster node
username = ""              # keep empty if not using ACL
password = ""              # keep empty if no authentication is required
tls = falsecluster:是否为集群。address:连接地址。当目的端为集群时,address填写集群中的任意一个节点即可鉴权:
- 当使用 ACL 账号体系时,配置
username和password - 当使用传统账号体系时,仅配置
password - 当无鉴权时,不配置
username和password
- 当使用 ACL 账号体系时,配置
tls:是否开启 TLS/SSL,不需要配置证书因为 RedisShake 没有校验服务器证书
注意事项:
- 当目的端为集群时,应保证源端发过来的命令满足 Key 的哈希值属于同一个 slot。
- 应尽量保证目的端版本大于等于源端版本,否则可能会出现不支持的命令。如确实需要降低版本,可以设置
target_redis_proto_max_bulk_len为 0,来避免使用restore命令恢
4 实战1- 单节点向一个一主一从伪集群发起同步
4.1 配置文件
vim shake.toml[sync_reader]
cluster = false # set to true if source is a redis cluster
address = "192.168.124.16:6379" # when cluster is true, set address to one of the cluster node
username = "" # keep empty if not using ACL
password = "123456" # keep empty if no authentication is required
tls = false #
sync_rdb = true # set to false if you don't want to sync rdb
sync_aof = true # set to false if you don't want to sync aof
prefer_replica = false # set to true if you want to sync from replica node
try_diskless = false # set to true if you want to sync by socket and source repl-diskless-sync=yes
[redis_writer]
cluster = false # set to true if target is a redis cluster
sentinel = false # set to true if target is a redis sentinel
master = "" # set to master name if target is a redis sentinel
address = "192.168.124.17:6379" # when cluster is true, set address to one of the cluster node
username = "" # keep empty if not using ACL
password = "123456" # keep empty if no authentication is required
tls = false
off_reply = false # ture off the server reply4.2 发起同步测试
nohup ./redis-shake shake.toml &- 待同步节点写入数据
[root@localhost redis-shake]# redis-cli -h 192.168.124.16 -p 6379
192.168.124.16:6379> auth 123456
OK
192.168.124.16:6379> set key1 value1
OK
192.168.124.16:6379> set key2 value2
OK- 同步节点读取测试
[root@localhost redis]#  redis-cli -h 192.168.124.17 -p 6379
192.168.124.17:6379> auth 123456
OK
192.168.124.17:6379> get key1
"value1"
192.168.124.17:6379> get key2
"value2"
192.168.124.17:6379>
使用增量同步,对源redis和目标redis的性能,会造成什么样的影响
新盘 上车集合 留下 我要发发 立马进裙coinsrore.com