搜索到
363
篇与
的结果
-
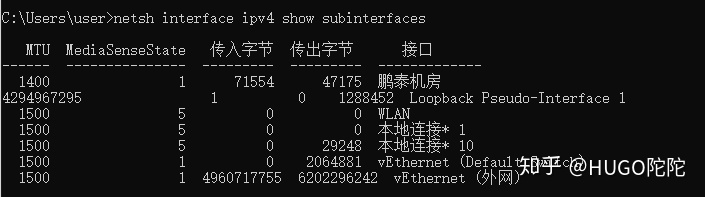
 ubuntu 16.04 pptp搭建服务端和客户端及异常处理 服务端1. 安装pptpsudo apt-get install pptpd2. 修改pptpd.conf中的配置信息sudo vim /etc/pptpd.conf在末尾增加下面两行,或者打开的内容里面找到这两行,取消掉注释localip 192.168.0.1 remoteip 192.168.0.234-238,192.168.0.245分别为创建pptp时的主机ip和连接pptp的其他主机使用的ip段,可以自行修改。注意,这里的ip并不是指外网ip或者当前局域网ip,而是指创建(虚拟专用网络)会分配的ip地址。一般这个可以不用修改。3. 修改chap-secrets配置连接pptp 所需要的账号和密码,修改配置文件/etc/ppp/chap-secretssudo vim /etc/ppp/chap-secrets在末尾添加以下内容#用户名 pptpd 密码 * neo pptpd 123456 *末尾的表示可以使用任意IP连入,如果你要设置指定IP才能连接,可以将替换成对应的IP。支持添加多个账号。4. 设置ms-dns配置使用的dns,修改配置文件sudo vim /etc/ppp/pptpd-options在末尾增加下面两行,或者打开的内容里面找到这两行,取消掉注释# 这是谷歌的DNS 可以根据实际填写 ms-dns 8.8.8.8 ms-dns 8.8.4.45. 开启转发修改配置文件sudo vim /etc/sysctl.conf在末尾增加下面内容,或者打开的内容里面找到这一行,取消掉注释net.ipv4.ip_forward=1保存之后执行sudo sysctl -p6. 配置iptables若未安装iptables 执行脚本安装sudo apt-get install iptablestips:若之前安装pptp失败的。执行以下脚本;如果是第一次安装可忽略以下内容(目的为了清除iptables里旧的规则)sudo iptables -F sudo iptables -X sudo iptables -t nat -F sudo iptables -t nat -X然后,允许GRE协议以及1723端口、47端口:sudo iptables -A INPUT -p gre -j ACCEPT sudo iptables -A INPUT -p tcp --dport 1723 -j ACCEPT sudo iptables -A INPUT -p tcp --dport 47 -j ACCEPT7.下一步,开启NAT转发:sudo iptables -t nat -A POSTROUTING -s 192.168.0.0/24 -o eno33 -j MASQUERADE注意,上面的eno33是连接网络的网卡的名称,不同机器这个可能是不一样的。可以在终端输入ifconfig来查看。例如neo@ubuntu:~$ ifconfig ens33 Link encap:Ethernet HWaddr 00:0c:29:37:79:85 inet addr:xxx.xxx.xxx.xxx Bcast:xxx.xxx.xxx.xxx Mask:255.255.255.0 inet6 addr: xxxx::20c:29ff:fe37:xxxx/64 Scope:Link UP BROADCAST RUNNING MULTICAST MTU:1500 Metric:1 RX packets:293 errors:0 dropped:0 overruns:0 frame:0 TX packets:211 errors:0 dropped:0 overruns:0 carrier:0 collisions:0 txqueuelen:1000 RX bytes:26801 (26.8 KB) TX bytes:41763 (41.7 KB)8 重启pptp服务sudo service pptpd restartubuntu客户端1. 安装pptp客户端sudo apt-get install pptp-linux2. 初始化一个连接通道:mypptp使用服务端设置的账号密码neo/6yhn^YHNsudo pptpsetup --create mypptp --server xxx.xxx.xxx.xxx --username neo --password 6yhn^YHN --encrypt --startxxx.xxx.xxx.xxx是pptp mypptp服务端的ip地址 根据实际情况填写(以下示例)root@ubuntu:~# sudo pptpsetup --create mypptp --server 172.31.1.112 --username neo --password 6yhn^YHN --encrypt --start Using interface ppp0 Connect: ppp0 <--> /dev/pts/2 CHAP authentication succeeded MPPE 128-bit stateless compression enabled local IP address 192.168.0.234 remote IP address 192.168.0.13. 查看连接是否成功root@ubuntu:~# ip addr show 1: lo: <LOOPBACK,UP,LOWER_UP> mtu 65536 qdisc noqueue state UNKNOWN group default qlen 1 link/loopback 00:00:00:00:00:00 brd 00:00:00:00:00:00 inet 127.0.0.1/8 scope host lo valid_lft forever preferred_lft forever inet6 ::1/128 scope host valid_lft forever preferred_lft forever 2: ens33: <BROADCAST,MULTICAST,UP,LOWER_UP> mtu 1500 qdisc pfifo_fast state UP group default qlen 1000 link/ether 00:0c:29:xx:86:5f brd ff:ff:ff:ff:ff:ff inet .31.1.113/24 brd xxx.31.1.2xxx5 scope global ens33 valid_lft forever preferred_lft forever inet6 fxx0::20c:29ff:fxx3e:8xxf/64 scope link valid_lft forever preferred_lft forever 8: ppp0: <POINTOPOINT,MULTICAST,NOARP,UP,LOWER_UP> mtu 1496 qdisc pfifo_fast state UNKNOWN group default qlen 3 link/ppp inet 192.168.0.234 peer 192.168.0.1/32 scope global ppp0 valid_lft forever preferred_lft forever也可以在pptp 服务端查看neo@ubuntu:~$ route -n Kernel IP routing table Destination Gateway Genmask Flags Metric Ref Use Iface 0.0.0.0 xxx.xxx.1.1 0.0.0.0 UG 0 0 0 ens33 xxx.xxx.1.0 0.0.0.0 255.255.255.0 U 0 0 0 ens33 192.168.0.234 0.0.0.0 255.255.255.255 UH 0 0 0 ppp04. 断开重启pptp客户端断开连接poff mypptp重接mypptppon mypptp5. 处理错误LCP: timeout sending Config-Requests执行:sudo modprobe nf_conntrack_pptp异常处理1.PPTP连接后无法打开网页,但QQ等软件又能使用的原因和解决方案PPTP连接后,能正常PING通局域网IP,DNS的IP,也能PING通百度这些网站的IP,但是网站偏偏打不开。直接PING域名,发现DNS也能解析域名,证明不是DNS出现的问题。在CMD里输入netsh interface ipv4 show subinterfaces发现PPTP连接“鹏泰机房”的MTU值是1400。而其它的连接都是1500。会不会是MTU没有自动协商造成了网络拥堵。参照下面这篇文章的方法PPTP拨入成功后在CMD里输入netsh interface ipv4 set subinterface "鹏泰机房" mtu=1400 store=persistent把pptp连接MTU固定修改为1400后。如飞的页面又能打开了。2.如果还是有些网页打不开服务器端执行iptables -I FORWARD -p tcp --syn -i ppp0 -j TCPMSS --set-mss 1356 或iptables -A FORWARD -p tcp --syn -s 192.168.0.0/24 -j TCPMSS --set-mss 1356参考资料ubuntu 16.04 pptp搭建服务端和客户端:https://blog.csdn.net/yanghao937170/article/details/105953256分析PPTP连接后无法打开网页,但QQ等软件又能使用的原因和解决方案:https://zhuanlan.zhihu.com/p/250068405PPTP MTU值设置导致主机无法上网问题解决:http://www.361way.com/pptp-mtu-mss/5173.html
 -
被窝网电视剧爬虫 被窝网电视剧爬虫#抓取电视剧 from bs4 import BeautifulSoup from urllib.request import urlopen import urllib import re import requests import os from tqdm import tqdm def download_from_url(url, dst): """ @param: url to download file @param: dst place to put the file :return: bool """ # 获取文件长度 try: file_size = int(urlopen(url).info().get('Content-Length', -1)) except Exception as e: print(e) print("错误,访问url: %s 异常" % url) return False # 判断本地文件存在时 if os.path.exists(dst): # 获取文件大小 first_byte = os.path.getsize(dst) else: # 初始大小为0 first_byte = 0 # 判断大小一致,表示本地文件存在 if first_byte >= file_size: print("文件已经存在,无需下载") return file_size header = {"Range": "bytes=%s-%s" % (first_byte, file_size)} pbar = tqdm( total=file_size, initial=first_byte, unit='B', unit_scale=True, desc=url.split('/')[-1]) # 访问url进行下载 req = requests.get(url, headers=header, stream=True) try: with(open(dst, 'ab')) as f: for chunk in req.iter_content(chunk_size=1024): if chunk: f.write(chunk) pbar.update(1024) except Exception as e: print(e) return False pbar.close() return True #网站根地址 web_base_url="http://10.1.48.113/" vedio_episodes_page_url_list=[ "http://10.1.48.113/shipin/dianshijuji/2018-09-29/193.php", "http://10.1.48.113/shipin/dianshijuji/2018-10-26/242.php", "http://10.1.48.113/shipin/dianshijuji/2018-10-26/239.php", "http://10.1.48.113/shipin/dianshijuji/2018-10-26/240.php", "http://10.1.48.113/shipin/dianshijuji/2018-10-26/238.php", "http://10.1.48.113/shipin/dianshijuji/2018-09-22/157.php" ] for vedio_episodes_page_url in vedio_episodes_page_url_list: #逐部电视剧解析 try: vedio_episodes_page_html = urlopen(vedio_episodes_page_url).read().decode('utf-8') vedio_episodes_page_soup = BeautifulSoup(vedio_episodes_page_html, features='lxml') #解析出电视剧名和设置保存文件夹 vedio_name=vedio_episodes_page_soup.head.find_all("meta")[2]["content"].replace(" ","") vedio_save_dir="./"+vedio_name if not os.path.exists(vedio_save_dir): os.mkdir(vedio_save_dir) #解析出单集播放页面地址 vedio_episode_href_list=vedio_episodes_page_soup.find_all('a', {"class": "meihua_btn"}) print("[开始下载]:"+vedio_name+"---"+vedio_episodes_page_url) #逐集解析 count=0 for vedio_episode_href in vedio_episode_href_list: vedio_episode_url = web_base_url + vedio_episode_href["href"] vedio_episode_html = urlopen(vedio_episode_url).read().decode('utf-8') vedio_episode_soup = BeautifulSoup(vedio_episode_html, features='lxml') count=count+1 vedio_episode_title = "第"+str(count)+"集" vedio_episode_save_path=vedio_save_dir+"/"+vedio_episode_title+".mp4" episode_url = web_base_url + re.findall("video:'(.*?)'",vedio_episode_html)[0] #逐集下载 print("[开始下载]:"+vedio_name+"---"+vedio_episode_title+"---"+episode_url) download_from_url(episode_url,vedio_episode_save_path) print("[下载完成]:"+vedio_name+"---"+vedio_episode_title) except Exception as e: print(e) print("错误,解析url: %s 异常" % vedio_episodes_page_url)
-
-
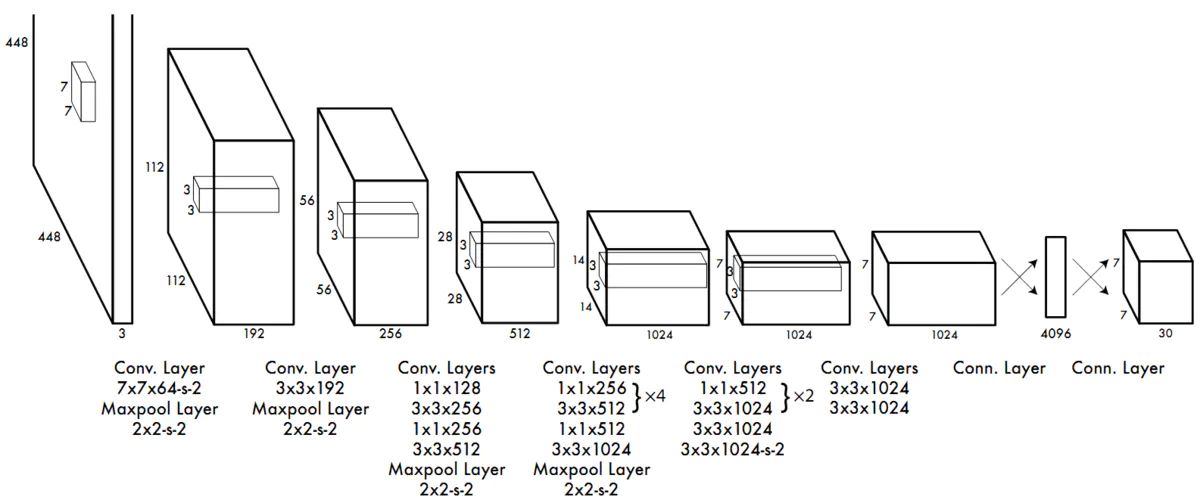
YOLOv1学习:(一)网络结构推导与实现 YOLOv1学习:(一)网络结构推导与实现原论文网络结构知乎看到的网络结构分析(见参考资料1)二次网络结构分析7*7*30输出解释实际操作如图所示,分为7*7个小格子,每个格子预测两个bounding box。如果一个目标的中心落入一个网格单元中,该网格单元负责检测 该目标。对每一个切割的小单元格预测(置信度,边界框的位置),每个bounding box需要4个数值来表示其位置,(Center_x,Center_y,width,height),即(bounding box的中心点的x坐标,y坐标,bounding box的宽度,高度)置信度定义为该区域内是否包含物体的概率,打标签的时候,正样本(与真实物体有最大IOU的边框设为正样本)置信度真值为1,负样本为0.还要得到分类的概率结果;20个分类每个类别的概率。7*7*30中的30=(20类概率+2*5(置信度,边框位置))Pytorch实现网络结构基本骨架import torch import torch.nn as nn feature = nn.Sequential( nn.Conv2d(in_channels=3,out_channels=64,kernel_size=7,stride=2,padding=3), nn.MaxPool2d(kernel_size=2,stride=2), nn.Conv2d(in_channels=64,out_channels=192,kernel_size=3,stride=1,padding=1), nn.MaxPool2d(kernel_size=2,stride=2), nn.Conv2d(in_channels=192,out_channels=128,kernel_size=1,stride=1,padding=0), nn.Conv2d(in_channels=128,out_channels=256,kernel_size=3,stride=1,padding=1), nn.Conv2d(in_channels=256,out_channels=256,kernel_size=1,stride=1,padding=0), nn.Conv2d(in_channels=256,out_channels=512,kernel_size=3,stride=1,padding=1), nn.MaxPool2d(kernel_size=2,stride=2), nn.Conv2d(in_channels=512,out_channels=256,kernel_size=1,stride=1,padding=0), nn.Conv2d(in_channels=256,out_channels=512,kernel_size=3,stride=1,padding=1), nn.Conv2d(in_channels=512,out_channels=256,kernel_size=1,stride=1,padding=0), nn.Conv2d(in_channels=256,out_channels=512,kernel_size=3,stride=1,padding=1), nn.Conv2d(in_channels=512,out_channels=256,kernel_size=1,stride=1,padding=0), nn.Conv2d(in_channels=256,out_channels=512,kernel_size=3,stride=1,padding=1), nn.Conv2d(in_channels=512,out_channels=256,kernel_size=1,stride=1,padding=0), nn.Conv2d(in_channels=256,out_channels=512,kernel_size=3,stride=1,padding=1), nn.Conv2d(in_channels=512,out_channels=512,kernel_size=1,stride=1,padding=0), nn.Conv2d(in_channels=512,out_channels=1024,kernel_size=3,stride=1,padding=1), nn.MaxPool2d(kernel_size=2,stride=2), nn.Conv2d(in_channels=1024,out_channels=512,kernel_size=1,stride=1,padding=0), nn.Conv2d(in_channels=512,out_channels=1024,kernel_size=3,stride=1,padding=1), nn.Conv2d(in_channels=1024,out_channels=512,kernel_size=1,stride=1,padding=0), nn.Conv2d(in_channels=512,out_channels=1024,kernel_size=3,stride=1,padding=1), nn.Conv2d(in_channels=1024,out_channels=1024,kernel_size=3,stride=1,padding=1), nn.Conv2d(in_channels=1024,out_channels=1024,kernel_size=3,stride=2,padding=1), nn.Conv2d(in_channels=1024,out_channels=1024,kernel_size=3,stride=1,padding=1), nn.Conv2d(in_channels=1024,out_channels=1024,kernel_size=3,stride=1,padding=1), ) classify = nn.Sequential( nn.Flatten(), nn.Linear(1024 * 7 * 7, 4096), nn.Linear(4096, 1470) #1470=7*7*30 ) yolov1 = nn.Sequential( feature, classify )基本骨架-结构打印Sequential( (0): Sequential( (0): Conv2d(3, 64, kernel_size=(7, 7), stride=(2, 2), padding=(3, 3)) (1): MaxPool2d(kernel_size=2, stride=2, padding=0, dilation=1, ceil_mode=False) (2): Conv2d(64, 192, kernel_size=(3, 3), stride=(1, 1), padding=(1, 1)) (3): MaxPool2d(kernel_size=2, stride=2, padding=0, dilation=1, ceil_mode=False) (4): Conv2d(192, 128, kernel_size=(1, 1), stride=(1, 1)) (5): Conv2d(128, 256, kernel_size=(3, 3), stride=(1, 1), padding=(1, 1)) (6): Conv2d(256, 256, kernel_size=(1, 1), stride=(1, 1)) (7): Conv2d(256, 512, kernel_size=(3, 3), stride=(1, 1), padding=(1, 1)) (8): MaxPool2d(kernel_size=2, stride=2, padding=0, dilation=1, ceil_mode=False) (9): Conv2d(512, 256, kernel_size=(1, 1), stride=(1, 1)) (10): Conv2d(256, 512, kernel_size=(3, 3), stride=(1, 1), padding=(1, 1)) (11): Conv2d(512, 256, kernel_size=(1, 1), stride=(1, 1)) (12): Conv2d(256, 512, kernel_size=(3, 3), stride=(1, 1), padding=(1, 1)) (13): Conv2d(512, 256, kernel_size=(1, 1), stride=(1, 1)) (14): Conv2d(256, 512, kernel_size=(3, 3), stride=(1, 1), padding=(1, 1)) (15): Conv2d(512, 256, kernel_size=(1, 1), stride=(1, 1)) (16): Conv2d(256, 512, kernel_size=(3, 3), stride=(1, 1), padding=(1, 1)) (17): Conv2d(512, 512, kernel_size=(1, 1), stride=(1, 1)) (18): Conv2d(512, 1024, kernel_size=(3, 3), stride=(1, 1), padding=(1, 1)) (19): MaxPool2d(kernel_size=2, stride=2, padding=0, dilation=1, ceil_mode=False) (20): Conv2d(1024, 512, kernel_size=(1, 1), stride=(1, 1)) (21): Conv2d(512, 1024, kernel_size=(3, 3), stride=(1, 1), padding=(1, 1)) (22): Conv2d(1024, 512, kernel_size=(1, 1), stride=(1, 1)) (23): Conv2d(512, 1024, kernel_size=(3, 3), stride=(1, 1), padding=(1, 1)) (24): Conv2d(1024, 1024, kernel_size=(3, 3), stride=(1, 1), padding=(1, 1)) (25): Conv2d(1024, 1024, kernel_size=(3, 3), stride=(2, 2), padding=(1, 1)) (26): Conv2d(1024, 1024, kernel_size=(3, 3), stride=(1, 1), padding=(1, 1)) (27): Conv2d(1024, 1024, kernel_size=(3, 3), stride=(1, 1), padding=(1, 1)) ) (1): Sequential( (0): Flatten() (1): Linear(in_features=50176, out_features=4096, bias=True) (2): Linear(in_features=4096, out_features=1470, bias=True) ) )加入损失函数和Dropoutimport torch import torch.nn as nn feature = nn.Sequential( nn.Conv2d(in_channels=3,out_channels=64,kernel_size=7,stride=2,padding=3), nn.LeakyReLU(), nn.MaxPool2d(kernel_size=2,stride=2), nn.Conv2d(in_channels=64,out_channels=192,kernel_size=3,stride=1,padding=1), nn.LeakyReLU(), nn.MaxPool2d(kernel_size=2,stride=2), nn.Conv2d(in_channels=192,out_channels=128,kernel_size=1,stride=1,padding=0), nn.LeakyReLU(), nn.Conv2d(in_channels=128,out_channels=256,kernel_size=3,stride=1,padding=1), nn.LeakyReLU(), nn.Conv2d(in_channels=256,out_channels=256,kernel_size=1,stride=1,padding=0), nn.LeakyReLU(), nn.Conv2d(in_channels=256,out_channels=512,kernel_size=3,stride=1,padding=1), nn.LeakyReLU(), nn.MaxPool2d(kernel_size=2,stride=2), nn.Conv2d(in_channels=512,out_channels=256,kernel_size=1,stride=1,padding=0), nn.LeakyReLU(), nn.Conv2d(in_channels=256,out_channels=512,kernel_size=3,stride=1,padding=1), nn.LeakyReLU(), nn.Conv2d(in_channels=512,out_channels=256,kernel_size=1,stride=1,padding=0), nn.LeakyReLU(), nn.Conv2d(in_channels=256,out_channels=512,kernel_size=3,stride=1,padding=1), nn.LeakyReLU(), nn.Conv2d(in_channels=512,out_channels=256,kernel_size=1,stride=1,padding=0), nn.LeakyReLU(), nn.Conv2d(in_channels=256,out_channels=512,kernel_size=3,stride=1,padding=1), nn.LeakyReLU(), nn.Conv2d(in_channels=512,out_channels=256,kernel_size=1,stride=1,padding=0), nn.LeakyReLU(), nn.Conv2d(in_channels=256,out_channels=512,kernel_size=3,stride=1,padding=1), nn.Conv2d(in_channels=512,out_channels=512,kernel_size=1,stride=1,padding=0), nn.LeakyReLU(), nn.Conv2d(in_channels=512,out_channels=1024,kernel_size=3,stride=1,padding=1), nn.LeakyReLU(), nn.MaxPool2d(kernel_size=2,stride=2), nn.Conv2d(in_channels=1024,out_channels=512,kernel_size=1,stride=1,padding=0), nn.LeakyReLU(), nn.Conv2d(in_channels=512,out_channels=1024,kernel_size=3,stride=1,padding=1), nn.LeakyReLU(), nn.Conv2d(in_channels=1024,out_channels=512,kernel_size=1,stride=1,padding=0), nn.LeakyReLU(), nn.Conv2d(in_channels=512,out_channels=1024,kernel_size=3,stride=1,padding=1), nn.LeakyReLU(), nn.Conv2d(in_channels=1024,out_channels=1024,kernel_size=3,stride=1,padding=1), nn.LeakyReLU(), nn.Conv2d(in_channels=1024,out_channels=1024,kernel_size=3,stride=2,padding=1), nn.LeakyReLU(), nn.Conv2d(in_channels=1024,out_channels=1024,kernel_size=3,stride=1,padding=1), nn.LeakyReLU(), nn.Conv2d(in_channels=1024,out_channels=1024,kernel_size=3,stride=1,padding=1), nn.LeakyReLU(), ) classify = nn.Sequential( nn.Flatten(), nn.Linear(1024 * 7 * 7, 4096), nn.Dropout(0.5), nn.Linear(4096, 1470) #1470=7*7*30 ) yolov1 = nn.Sequential( feature, classify ) print(yolov1)参考资料YOLO V1 网络结构分析:https://zhuanlan.zhihu.com/p/220062200?utm_source=wechat_sessionYOLOv1算法理解:https://www.cnblogs.com/ywheunji/p/10808989.html
-
VNC连接报错“too many security failures”解决 服务器装了虚拟机之后,通过VNC VIEWER远程管理,但连接的时候,经常报错“too many security failures”。 这是因为VNC的黑名单机制,用来保护你的服务器。如果有人暴力破解,将会触发VNC的黑名单机制。因此,有两种方式可以让你重新登录。1、杀掉vncserver进程,再重新启动,就可以登录了。sudo vncserver -kill :1 sudo vncserver :12、重置黑名单。vncconfig -display :1 -set BlacklistTimeout=0 -set BlacklistThreshold=1000000 #重新登录之后恢复黑名单设置: vncconfig -display :1 -set BlacklistTimeout=100000000000 -set BlacklistThreshold=10 #display :指定桌面号 (一般为1) #BlacklistTimeout : 设置黑名单的过期时间 #BlacklistThreshold : 允许的失败次数 #默认的过期时间是600秒,这里设置的很大,目的是延长黑名单的时间。参考资料2019-01-31 VNC连接报错“too many security failures”
-
frp常用配置详解 frp常用配置详解frp是一个非常优秀的内网穿透利器,只要有了它,再加一个公网服务器,我们可以穿透内网中的任何一个网络设备。1、frpc.ini 客户端配置[common] # 公网ip地址 server_addr = 139.196.xx.x # 服务监听端口 server_port = 7000 # token校验 token = raven #本地监控 admin_addr = 127.0.0.1 admin_port = 7400 admin_user = admin admin_pwd = admin #web服务 [web-http] type = http local_port = 80 local_ip = 127.0.0.1 # 可以设置二级、三级域名 服务器端无需设置subdomain_host custom_domains = raven520.top,www.raven520.top #使用这个属性,服务端需用 subdomain_host 指定一个域名,并且只能用二级域名 #subdomain = hello # 配置访问时候的账号密码 #http_user = abc #http_pwd = abc # tcp穿透 反向代理 [RDP] type = tcp local_port = 3389 # 指定服务器监听哪个端口进行监听。使用 ip:3388 即可远程连接本地主机 remote_port = 3388 local_ip = 0.0.0.02、frps.ini 服务端配置[common] # frps绑定端口 bind_port = 7000 # http 访问端口 vhost_http_port = 80 #服务端监控 dashboard_port = 7500 dashboard_user = admin dashboard_pwd = admin #用这个可以指定域名,客户端可以使用 subdomain,指定一个二级域名。 #用了这个属性,客户端无法开启 custom_domains ,否则服务异常。 #subdomain_host = raven520.top # token校验 token=raven
-
-
搭建web IDE--Code-server 搭建web IDE--Code-server原理基础code-server是一款基于VScode的在线编辑器,主要用于在Linux服务器环境下,实现任何设备通过浏览器即可访问VScode, 进而实现在远程编程.官方文档GIthub官方安装教程文档:https://github.com/cdr/code-server/blob/v3.8.0/doc/install.mdDebian, Ubuntucurl -fOL https://github.com/cdr/code-server/releases/download/v3.8.0/code-server_3.8.0_amd64.deb sudo dpkg -i code-server_3.8.0_amd64.deb sudo systemctl enable --now code-server@$USER # Now visit http://127.0.0.1:8080. Your password is in ~/.config/code-server/config.yamlFedora, CentOS, RHEL, SUSEcurl -fOL https://github.com/cdr/code-server/releases/download/v3.8.0/code-server-3.8.0-amd64.rpm sudo rpm -i code-server-3.8.0-amd64.rpm sudo systemctl enable --now code-server@$USER # Now visit http://127.0.0.1:8080. Your password is in ~/.config/code-server/config.yamlArch Linux# Installs code-server from the AUR using yay. yay -S code-server sudo systemctl enable --now code-server@$USER # Now visit http://127.0.0.1:8080. Your password is in ~/.config/code-server/config.yaml # Installs code-server from the AUR with plain makepkg. git clone https://aur.archlinux.org/code-server.git cd code-server makepkg -si sudo systemctl enable --now code-server@$USER # Now visit http://127.0.0.1:8080. Your password is in ~/.config/code-server/config.yamlDebian, Ubuntucurl -fOL https://github.com/cdr/code-server/releases/download/v3.8.0/code-server_3.8.0_amd64.deb sudo dpkg -i code-server_3.8.0_amd64.deb sudo systemctl enable --now code-server@$USER # Now visit http://127.0.0.1:8080. Your password is in ~/.config/code-server/config.yamlFedora, CentOS, RHEL, SUSEcurl -fOL https://github.com/cdr/code-server/releases/download/v3.8.0/code-server-3.8.0-amd64.rpm sudo rpm -i code-server-3.8.0-amd64.rpm sudo systemctl enable --now code-server@$USER # Now visit http://127.0.0.1:8080. Your password is in ~/.config/code-server/config.yamlArch Linux# Installs code-server from the AUR using yay. yay -S code-server sudo systemctl enable --now code-server@$USER # Now visit http://127.0.0.1:8080. Your password is in ~/.config/code-server/config.yaml # Installs code-server from the AUR with plain makepkg. git clone https://aur.archlinux.org/code-server.git cd code-server makepkg -si sudo systemctl enable --now code-server@$USER # Now visit http://127.0.0.1:8080. Your password is in ~/.config/code-server/config.yamlmacOSbrew install code-server brew services start code-server # Now visit http://127.0.0.1:8080. Your password is in ~/.config/code-server/config.yamlDocker# This will start a code-server container and expose it at http://127.0.0.1:8080. # It will also mount your current directory into the container as `/home/coder/project` # and forward your UID/GID so that all file system operations occur as your user outside # the container. # # Your $HOME/.config is mounted at $HOME/.config within the container to ensure you can # easily access/modify your code-server config in $HOME/.config/code-server/config.json # outside the container. mkdir -p ~/.config docker run -it --name code-server -p 127.0.0.1:8080:8080 \ -v "$HOME/.config:/home/coder/.config" \ -v "$PWD:/home/coder/project" \ -u "$(id -u):$(id -g)" \ -e "DOCKER_USER=$USER" \ codercom/code-server:latest
-
Python使用类似JavaScript的对象——EasyDict(更强大的Dict) Python使用类似JavaScript的对象——EasyDict(更强大的Dict)简介用惯 JavaScript 的人上来用 Python 的字典 dict 会很困惑,为什么只能用[]取属性而不能用.呢?JavaScriptvar data = { 'class1': { 'a': {'Chinese': 80}, '小明': {'Chinese': 90}, } }; console.log(data); console.log(data.class1, data['class1']); console.log(data.class1.a, data['class1']['a']); console.log(data.class1.a.Chinese, data['class1']['a']['Chinese']); console.log(data.class1['小明'].Chinese); // 混着用Python 会报错 AttributeError: 'dict' object has no attribute 'xxx'data = { 'class1': { 'a': {'Chinese': 80}, '小明': {'Chinese': 90}, } } print(data) print(data.class1, data['class1']) print(data.class1.a, data['class1']['a']) print(data.class1.a.Chinese, data['class1']['a']['Chinese']) print(data.class1['小明'].Chinese) # 混着用安装pip install easydictPS:可以不安装直接使用源码,仅30行,见文末初试from easydict import EasyDict data = { 'class1': { 'a': {'Chinese': 80}, '小明': {'Chinese': 90}, } } data = EasyDict(data) print(data) print(data.class1, data['class1']) print(data.class1.a, data['class1']['a']) print(data.class1.a.Chinese, data['class1']['a']['Chinese']) print(data.class1['小明'].Chinese) # 混着用 # {'class1': {'a': {'Chinese': 80}, '小明': {'Chinese': 90}}} # {'a': {'Chinese': 80}, '小明': {'Chinese': 90}} {'a': {'Chinese': 80}, '小明': {'Chinese': 90}} # {'Chinese': 80} {'Chinese': 80} # 80 80 # 90 1234567891011121314151617181920 EasyDict` 本质上还是 `Dict from easydict import EasyDict data = EasyDict(log=False) data.debug = True print(data.items()) # dict_items([('log', False), ('debug', True)])EasyDict 源码class EasyDict(dict): def __init__(self, d=None, **kwargs): if d is None: d = {} if kwargs: d.update(**kwargs) for k, v in d.items(): setattr(self, k, v) for k in self.__class__.__dict__.keys(): if not (k.startswith('__') and k.endswith('__')) and not k in ('update', 'pop'): setattr(self, k, getattr(self, k)) def __setattr__(self, name, value): if isinstance(value, (list, tuple)): value = [self.__class__(x) if isinstance(x, dict) else x for x in value] elif isinstance(value, dict) and not isinstance(value, self.__class__): value = self.__class__(value) super(EasyDict, self).__setattr__(name, value) super(EasyDict, self).__setitem__(name, value) __setitem__ = __setattr__ def update(self, e=None, **f): d = e or dict() d.update(f) for k in d: setattr(self, k, d[k]) def pop(self, k, d=None): delattr(self, k) return super(EasyDict, self).pop(k, d)
-
grub开机引导(grub rescue)修复 grub开机引导(grub rescue)修复1、查看分区:grub rescue> ls 会出现如下字样:(hd0) (hd0,msdos9) (hd0,msdos8) (hd0,msdos7) (hd0,msdos6) (hd0,msdos5) (hd0,msdos2) (hd0,msdos1) 注:上面是我的分区设备,每个人可能不一样,但原理都是一样的。2、寻找ubuntu所在分区:(就是寻找你的Linux系统是装在以上哪个分区里)grub rescue> ls (hd0,msdos1)/ 若出现unknown filesystem字样,则尝试下一个若出现的是你的ubuntu主文件夹下的文件夹和文件的名字,那就是的要找的分区了。3、修改启动分区:(假如你找到的启动分区是hd0,msdos8)grub rescue>root=(hd0,msdos8) grub rescue>prefix=/boot/grub //grub路径设置 grub rescue>set root=(hd0,msdos8) grub rescue>set prefix=(hd0,msdos8)/boot/grub grub rescue>insmod normal //启动normal启动 grub rescue>normal 之后你就会看到熟悉的启动菜单栏了4、进入ubuntu修复grub sudo update-grub sudo grub-install /dev/sda5、重启,搞定!!
-
Jupyter Notebook样式美化 Jupyter Notebook样式美化安装jupyterthemes# install jupyterthemes pip install jupyterthemes # upgrade to latest version pip install --upgrade jupyterthemes调整样式首先,我们看看有哪些样式可供选择。在cmd中,我们允许命令:jt -l便可查看样式列表:想更改样式,直接在cmd中输入jt -t 主题名即可。下面我随便展示一下其中的几个:①chesterish:②grade3:③gruvboxd:④gruvboxl:⑤monokai:是不是酷炫了许多?!但是,我还是不太满意,因为有一些字体不够美观,输出区的字体太小了,这个时候就需要借助jupyterthemes中的各种命令来调整了。经过我的反复调试,我终于调整到了我看得舒服的样式,下面分享一下我的个性化命令:jt -t onedork -f roboto -fs 14 -nfs 14 -tfs 14 -ofs 11得到的样子是这样的:字体美观,大小合适,甚合朕意!当然,每个人审美不同,大家可以根据自己的喜好进行调整。
-
jupyter notebook 配置远程访问 jupyter notebook 配置远程访问不更改配置的方法这种方法不更改服务器本身配置,只是在本次使用时设置使其他电脑可见。jupyter notebook --ip 0.0.0.0 --port 8888更改配置的方法这种方法可以一次性配置好,直接运行jupyter notebook即可。1. 环境说明Linux服务器上安装有Anaconda,同时安装有jupyter notebook;在服务器上启动jupyter, 想要通过其他电脑远程访问(通过服务器ip和端口)。非root用户2. 配置步骤注:开始配置之前,已默认平台已经安装有jupyter自行创建配置文件jupyter notebook --generate-config执行成功会出现类似如下的提示:Writing default config to: /home/XXX/.jupyter/jupyter_notebook_config.py手动生成密码打开ipython执行如下内容:In [1]: from IPython.lib import passwd In [2]: passwd() Enter password: ##这个密码一定要记好,之后远程登录时要用到。 Verify password: Out[2]: 'sha1:2ad953ec30d1:19cedef173b41db0a356d879ed30547199e879f5' #(a)生成的密文,把该密文复制,之后会用到。修改配置文件vim /home/XXX/.jupyter/jupyter_notebook_config.py对如下内容进行修改,并取消注释c.NotebookApp.ip='*' c.NotebookApp.password = u'sha1:ff96895bc63e:390021c354c848eda43ccf29f4e3cc7a7cc48b29' #密码:a c.NotebookApp.open_browser = False c.NotebookApp.port =8888 #随便指定一个端口vim命令提示:查找 / + 要查找的字符串,回车;保存 :w保存退出::wq启动jupyter notebookjupyter notebook远程访问从其他电脑的浏览器访问 address_of_server:8888, 输入密码即可进入jupyter的使用界面。
-
CentOS更换yum源 CentOS更换yum源centos7:163yum源:1)备份当前yum源防止出现意外还可以还原回来cd /etc/yum.repos.d/ cp CentOS-Base.repo CentOS-Base-repo.bak2)使用wget下载163yum源repo文件wget http://mirrors.163.com/.help/CentOS7-Base-163.repo3) 清理旧包yum clean all4)把下载下来163repo文件设置成为默认源mv CentOS7-Base-163.repo CentOS-Base.repo5)生成163yum源缓存并更新yum源yum makecache yum update阿里云yum源:1)备份当前yum源防止出现意外还可以还原回来cd /etc/yum.repos.d/ cp CentOS-Base.repo CentOS-Base-repo.bak2)使用wget下载阿里yum源repo文件wget http://mirrors.aliyun.com/repo/Centos-7.repo3) 清理旧包yum clean all4)把下载下来阿里云repo文件设置成为默认源mv Centos-7.repo CentOS-Base.repo5)生成阿里云yum源缓存并更新yum源yum makecache yum updatecentos61.首先备份原来的cent os官方yum源cp /etc/yum.repos.d/CentOS-Base.repo /etc/yum.repos.d/CentOS-Base.repo.bak2.获取阿里的yum源覆盖本地官方yum源wget -O /etc/yum.repos.d/CentOS-Base.repo http://mirrors.aliyun.com/repo/Centos-6.repo3.清理yum缓存,并生成新的缓存yum clean all yum makecache
-
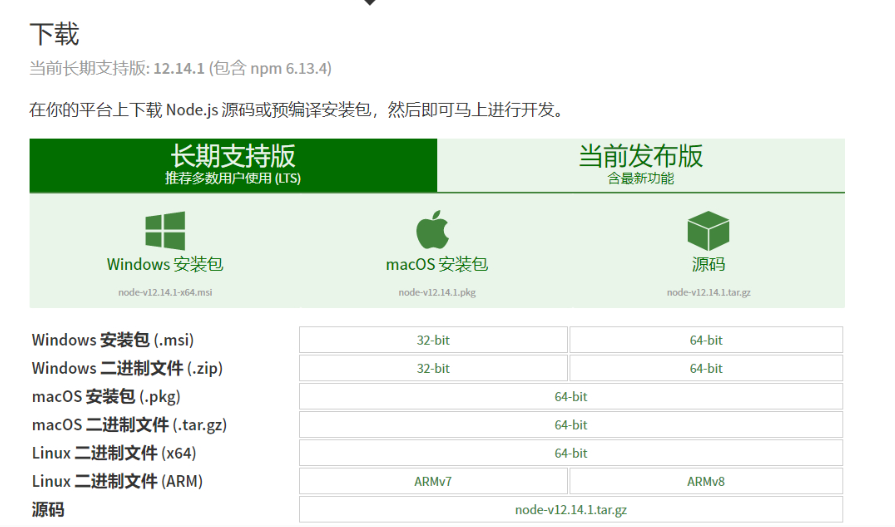
在树莓派上安装最新版Nodejs 在树莓派上安装最新版Nodejs树莓派的初始镜像上一般没有安装Nodejs,而我们要用到Nodejs时,就要考虑在树莓派上安装Nodejs了,本文教大家在树莓派上快速安装Nodejs。一、检查是否安装了Nodejs使用 node -v 和npm -v 命令可以快速查看树莓派上是否安装了Nodejs。pi@raspberrypi:~ $ node -v -bash: node: command not found pi@raspberrypi:~ $ npm -v -bash: npm: command not found从树莓派返回的信息“node: command not found”来看,在树莓派上没有安装Nodejs.二、安装方法1、查看系统信息pi@raspberrypi:~ $ file /bin/ls /bin/ls: ELF 32-bit LSB executable, ARM, EABI5 version 1 (SYSV), dynamically linked, interpreter /lib/ld-linux-armhf.so.3, for GNU/Linux 3.2.0, BuildID[sha1]=67a394390830ea3ab4e83b5811c66fea9784ee69, stripped pi@raspberrypi:~ $ uname -a Linux raspberrypi 4.19.75-v7+ #1270 SMP Tue Sep 24 18:45:11 BST 2019 armv7l GNU/Linux通过查看可以看到系统是32位的,而且是ARM v7架构,知道这些信息后,我们去Nodejs官网上下载相应的安装包。2.下载 Node.js 预编译安装包我们根据系统版本选择 Linux 二进制文件 (ARM) ARMv7 版本,然后下载到树莓派上。pi@raspberrypi:~ $ wget https://nodejs.org/dist/v12.14.1/node-v12.14 Tue 17 Mar 21:02:31 CST 2020 更新:由于node.js更新,最新的node.js下载命令为:pi@raspberrypi:~ $ wget https://nodejs.org/dist/v12.16.1/node-v12.16.1-linux-armv7l.tar.xz3、安装Nodejs安装包在树莓派上下载好之后,我们解压安装包。pi@raspberrypi:~ $ tar -xvf node-v12.16.1-linux-armv7l.tar.xz解压后,在当前文件夹为生成node-v12.14.1-linux-armv7l文件夹,我们进这个文件夹进行测试。$ cd node-v12.16.1-linux-armv7l/bin #进入node 文件夹 $ ./node -v #查看node版本输出没问题后,我们进行最后一步,配置链接,使得不进入node的这跟文件夹就可以使用node。4.配置Node和npm链接$ sudo ln /home/pi/node-v12.16.1-linux-armv7l/bin/node /usr/local/bin/node #配置node的链接 $ sudo ln -s /home/pi/node-v12.16.1-linux-armv7l/bin/npm /usr/local/bin/npm #配置npm 的软链接配置完成后,就可以使用node -v 和npm -v 来查看Nodejs 是否安装成功了。pi@raspberrypi:~ $ node -v v12.14.1 pi@raspberrypi:~ $ npm -v 6.13.4
-
树莓派使用Ngrok进行内网穿透 树莓派使用Ngrok进行内网穿透一、注册Sunny-Ngrok,并开通隧道在Sunny-Ngrok上注册一个账号,然后进入后台,开通一个隧道。二、下载客户端,并启动隧1.在树莓派上下载Ngrok客户端下载地址:http://hls.ctopus.com/sunny/linux_arm.zip?v=2下载完成之后将客户端执行文件移动到 /use/local/bin 目录下并给予可执行权限。sudo mv sunny /usr/local/bin/sunny sudo chmod +x /usr/local/bin/sunny2、编写启动脚本sudo nano /etc/init.d/sunny/etc/init.d/sunny 启动脚本代码#!/bin/sh -e ### BEGIN INIT INFO # Provides: ngrok.cc # Required-Start: $network $remote_fs $local_fs # Required-Stop: $network $remote_fs $local_fs # Default-Start: 2 3 4 5 # Default-Stop: 0 1 6 # Short-Description: autostartup of ngrok for Linux ### END INIT INFO NAME=sunny DAEMON=/usr/local/bin/$NAME PIDFILE=/var/run/$NAME.pid [ -x "$DAEMON" ] || exit 0 case "$1" in start) if [ -f $PIDFILE ]; then echo "$NAME already running..." echo -e "\033[1;35mStart Fail\033[0m" else echo "Starting $NAME..." start-stop-daemon -S -p $PIDFILE -m -b -o -q -x $DAEMON -- clientid 隧道id || return 2 echo -e "\033[1;32mStart Success\033[0m" fi ;; stop) echo "Stoping $NAME..." start-stop-daemon -K -p $PIDFILE -s TERM -o -q || return 2 rm -rf $PIDFILE echo -e "\033[1;32mStop Success\033[0m" ;; restart) $0 stop && sleep 2 && $0 start ;; *) echo "Usage: $0 {start|stop|restart}" exit 1 ;; esac exit 0⚠️注意:把代码里面的【隧道id】替换成自己的隧道id3、测试可执行代码sudo chmod 755 /etc/init.d/sunny sudo /etc/init.d/sunny start sudo /etc/init.d/sunny start #启动 sudo /etc/init.d/sunny stop #停止 sudo /etc/init.d/sunny restart #重启4、设置开机启动cd /etc/init.d sudo update-rc.d sunny defaults 90 #加入开机启动 sudo update-rc.d -f sunny remove #取消开机启动四、完成启动Ngrok 隧道,可以看到服务器已经上线了。